Creating a Campaign
Follow the steps to create a new campaign and learn how to use the drag-and-drop editor to organize your content.
Create a New Campaign
To create a new campaign, start by navigating to the Campaigns tab, and then follow these steps:
- Go to Emails in the left panel.
- Click "Create New Campaign" on the right

- Select "Regular Email"
- Give your campaign a name (e.g., "August Newsletter | Campus Recreation"), and click "Continue."
- Choose a Template or start from scratch using the drag-and-drop editor.
- University templates that meet branding requirements are in the "Shared Templates" section of the left menu.
- For recurring emails, request a custom template from the Web Content team, which will also appear in "Shared Templates" once created.
*Important Note: Remember to periodically save or click on elements in the top gray bar to reset the 50-minute inactivity timer and avoid being logged out.
Content
- Drag the Title block from the right panel into your email.
- Use the blue text toolbar for text formatting and the Content Properties panel for block settings like font size and alignment.
- Use semantic elements by structuring your content like this:
- Main Title: H1
- Subheaders and Section Titles: H2 or H3

- Drag the Paragraph or List block from the right panel into your email.
- Use the blue text toolbar for text formatting and the Content Properties panel for block settings like font size and alignment.
How to use the Title, Paragraph, and List blocks according to MyEmma.
- Drag the Image block into your campaign.
- Click "Browse" to select or upload images.
- Use the Content Properties panel to edit the image, adjust alignment, add alternate text, and more.
Header Image Size
- Recommended Width: 600 to 700 pixels.
- Height: 100 to 200 pixels (proportional to the width).
Campaign Content Images
- Ideal size: 480 px x 480 px or smaller.
Image File Types
- GIF, JPG/JPEG, and PNG
Keep your total email size under 2 MB to avoid being blocked by filters or firewalls.
How to use the Image block and its image editor according to MyEmma.
- Drag the Button block into your campaign.
- Customize text, font, colors, and alignment using the text toolbar and Content Properties panel.
- Link the button to a webpage, email, phone number, or SMS.
*Do not use "Learn More," "Read More," or "Click Here" buttons as they can be problematic from a usability perspective. Use descriptive links.
How to use the Button block according to MyEmma.
- Drag the Social block into your campaign.
- Add and remove icons as needed.
- Replace to default URLs with your organization's unique profile links.
- *If you do not update the default URLs, they will simply link to that social media site in general and not to a specific profile.
How to use the Social block according to MyEmma.
Rows
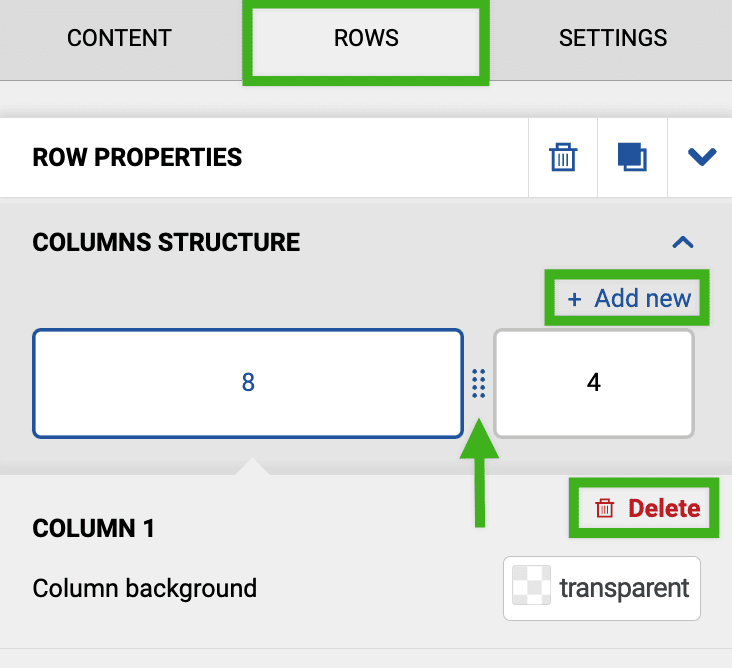
- Resize a column: Click on the dots between that column and its neighbor in the Row properties panel and drag it from side-to-side until the two columns reach the desired size ratio.
- Delete a column: Click on that column in the Row properties panel and then select Delete.
- Turn mobile stacking on or off.
- Change the mobile stacking order if stacking is enabled.
- Choose to hide the row on desktop or mobile.
Hide on Mobile or Desktop
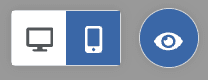
If you've chosen to hide any blocks or rows on mobile, then you will see a third icon in the upper left corner of the page. The eye icon represents the visibility of hidden elements and can be used to turn off or on any hidden content.
This allows you to temporarily hide content that's hidden on mobile for the sake of previewing your design and then turn it back on so that you make sure that it doesn't get moved to the wrong place while you're working.
If you're not happy with a row's appearance on desktop or mobile, even after adjusting mobile stacking, create two versions—one for mobile and one for desktop—and hide the other as needed.
Row Background Color
Changing the row background color will override the Settings tab's background color.
Content Area Background Color
This color applies to the entire row and columns within it.
Choose the border style, size, and color.
- Click "More options" to adjust the border for each side individually.
- Use the plus and minus signs to round the corners or click "More options" to round each corner individually.
Still Need Help?
Whether you're working in Cascade, MyEmma, or the Event Calendar, the Web Content team is here to help you get your message out there.