Deleting Pages and Assets
Learn to properly delete pages and assets.
To Delete or Not to Delete? That is the Question
You may realize that a page is no longer needed or that the information from one page can be consolidated to another. In these cases you may have to delete a page or file. While it's possible to delete pages and files in Cascade, that doesn't mean you should go around with an attitude of slash and burn.
Whenever deleting pages in Cascade do so after some soul searching. Here are some questions to consider:
- Do I absolutely have to delete this page?
- What does this page link out to?
- What pages link to this page?
- Do I need to create a redirect that allows for users to find the information at a different URL?
If the page has to go, there's no way around it—you'll have to properly delete it from Cascade.
This page will cover how to:
Deleting pages and assets in Cascade
When deleting a page or an asset tree there are two ways to go about starting the process. You can access the page from the asset tree and then select the page or asset in folder view, or you can click on the page itself and open frontend view, where you start your edit process for the page.
When deleting a page, we prefer doing it from the frontend view of the page so you can make absolutely sure you're going to delete the page you want to.
Please don't start deleting things until you've read this step-by-step process.
Here's the step-by-step:
- Locate the page or the asset you want to do delete. (If you want to delete an entire folder, click on the folder's for a scrollable pop-up window. From there, select delete).

- Once the drop down menu appears, select "Delete" to start the process. Note that if the page is in a workflow or is currently in draft with another user, you won't be able to delete it.
- Once you select "Delete" a "Delete Page" window will appear in the center of your screen that will ask you if you're sure about deleting the page.
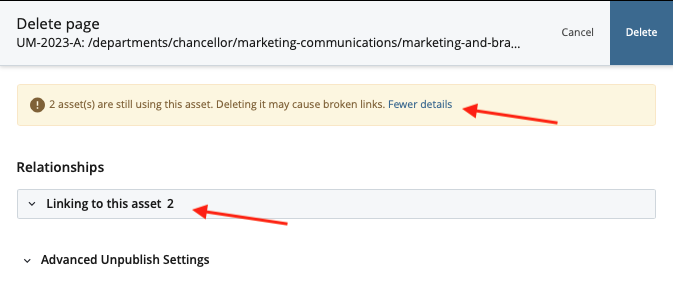
Before you press "Delete" in the top right corner, there's something you need to do.- Make sure their are no relationships between the page you're deleting and any other pages still on Cascade. If this page is linked to others, you'll find a warning message that lets you know your page or asset is being used someplace else. You'll also see the "Relationship" section has a drop down, with more information about those pages still linking to the page you're trying to delete.
Learn more about managing relationships between deleted pages.
- Make sure their are no relationships between the page you're deleting and any other pages still on Cascade. If this page is linked to others, you'll find a warning message that lets you know your page or asset is being used someplace else. You'll also see the "Relationship" section has a drop down, with more information about those pages still linking to the page you're trying to delete.
- Once you're ready to move forward with deleting the page or the asset, click the "Delete" button in the top right corner of the screen. A small message will appear at the bottom of your screen, letting you know about the progress of the file deletion, which will also confirm that the item has been removed from both Cascade and olemiss.edu
- Next, you'll need to republish the parent folder that held the asset you just deleted. To do this, choose the folder from the asset tree This will make sure that everything is properly updated. If your changes the global areas of olemiss.edu or a school site (e.g., headers, footers, top navigation) go ahead and reach out to the Web Content Team before you get started.

Checking links to and from your deleted page
When deleting pages or assets you may find that they are tangled up with other pages that are still live on olemiss.edu. If that's the case you have to make sure to severe those relationships so that users don't come to a deadend and find a 404 error instead of the what they were looking for.
Unlinking an asset from other assets isn't that complicated but it may take some time.
Here's the step-by-step:
- From the "Delete page" pop-up window, expand the "Relationships" section to see a list of assets linked to the one you're about to delete.
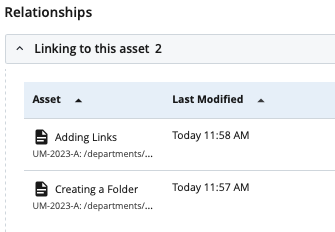
- Click on every asset in the "Relationship" section. Each time you click on the asset you'll go to that specific asset where you'll edit it to remove the link to the deleted page. This may be a bit time consuming because you'll have to hunt down the link to the page you're deleting.
The easiest way to do this is to stay on the preview screen and open up each link in a new tab. - Once you find the link, go ahead and break the link. Removing the link may mean you have to delete parts of modules, entire modules, or just hunt down linked text. Whatever you do, make sure you leave the edited page just as good as you found it.
- Once you've removed the link from the page, create a comment at the top of the page explaining what you've done to the page and why. Then push the page through a workflow. Your message will let your publisher know why they're seeing this page come through workflow.
- Click the back button on your browser to make it back to the "Delete page" window. Work through all linked assets until you are done and then click the "Delete" button at the top of the window.
Restoring deleting pages and files in Cascade
So, you drank a bunch of caffeine and deleted ten pages and you only needed to trash one. Oops. Luckily, you can restore your page and no one will be the wiser.
- Cascade will hold on to deleted items in the Trash for 15 days. Not that long, but hopefully long enough for you correct your mistake.
Here's the step-by-step:
- Make sure that you're looking at the site in which you deleted your page.
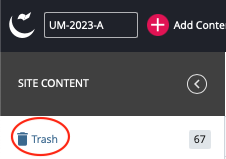
- Go to the "Site Content" side bar on the left side of your screen.
- Select the trash icon a the top of the asset tree.
- Find the item you so brashly deleted and need to restore.
- Click the item and then select the restore button.

Still Need Help?
Whether you're working in Cascade, MyEmma, or the Event Calendar, the Web Content team is here to help you get your message out there.